
Shortening Standard Pencil-Pleat Curtains
When you need to shorten curtains, it sometimes appears to be more complicated than it actually is. This is especially true when it comes to pencil-pleat curtains that are lined. In fact, with pencil-pleat curtains, whether you need to shorten lined curtains or unlined curtains, it makes no difference. How did you work that out..? I hear you ask.
Well, some might say it’s a trade secret but I just think of it as a logical approach to getting the job done. Are you ready..?
Shorten curtains that have pencil-pleat header tape from the top not the bottom.
There it is… the big secret. Now if that has just confused you, don’t worry, I’ll explain in more detail.
HOW TO SHORTEN CURTAINS STEP BY STEP:
Things You’ll Need:
- Tape Measure
- Step-ladder
- Pen or Pencil
- Paper
- Scissors
- Unpicker
- Pins
- Oh yes – and a sewing machine would be useful.
Step 1 – How Long..?
The first thing we need to know when we shorten curtains is – how long does the ‘finished length’ of the curtains need to be..? There are a few ways to get this measurement.
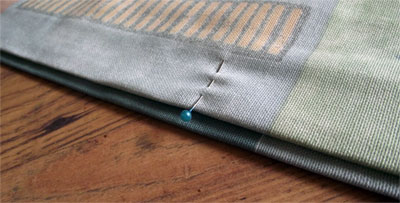
One way, and possibly the best, would be to hang one of the curtains but don’t gather it. Decide were you want them to finish, and stick a pin in at the edge. Be sure to put the pin sideways and please, don’t use a marker or pen instead. If you don’t have any pins, you may as well get some, your going to need them later.
Now, with the pin in place, take the curtain down, fold it in half length-ways and lay it on a flat surface. Measure from the top edge of the curtain down to the pin. Write down your measurement, double check it and remove the pin.
Another way which is definitely quicker but maybe not as accurate. Get somebody tall with long arms – or a step ladder, and follow steps 3 and 4 of our Measure for Curtains guide.
Step 2 – Fold and Pin
No… put the scissors down we’re not ready for those yet.
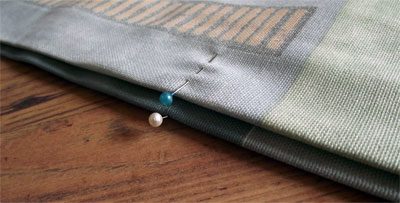
Right, with our curtain still folded in half length-ways, measure the curtain again but this time form the bottom edge towards the top. Stick a pin in one edge at the measurement we wrote down.
Check that the bottom corners are together and that there are no lumps or wrinkles in the edges of the curtain. Check the measurement again and put a pin in the other edge.
Now we open out our curtain and lay it out flat with the face fabric down. (We should be looking at the back of the curtain fabric, or lining fabric, with the header tape along the top edge). Fold the top down so that the fold is level with the pins. When doing this, we are folding so that we can see the face fabric along the top of the curtain.

Side Note: In my many years of experience, when a customer has asked me to shorten curtains, I have often come across curtains that are longer one side than the other. This can cause problems when you shorten curtains.
So with my little side note in mind, it may be that the amount folded down at one edge is different than the other. Here’s what we’ll do…
Measure the amount folded down at each edge – Are they the same..?
- Yes..! – Measure to check we have the same distance folded down all the way along the fold.
- No..! – Work your way across measuring from the bottom of the curtain up to the fold instead. This will ensure that you have correct amount folded down.
Now we work our way along the fold pinning all the layers of curtain fabric together.
Step 3 – Move the Header Tape
Ok, so we’ve measured, folded and pinned our curtain to the length we want it. All that’s left now is to move the header tape. Grab your unpicker and yep, you guessed it, unpick the header tape. There is a quick way to do this but you first need to unpick the double stitched bit at the end of the header tape. Once you’ve done that, get a tight grip on the header tape with one hand, and on the curtain fabric with the other. Now, with a sharp tug, pull them apart. (Warning: this is not recommended with light-weight, satin or silky fabrics.)

Sorry, it’s time for the boring bit now. Take your header tape and remove all the old loose bits of thread from the edges.
Done that..? – Good!… See, I said it was boring
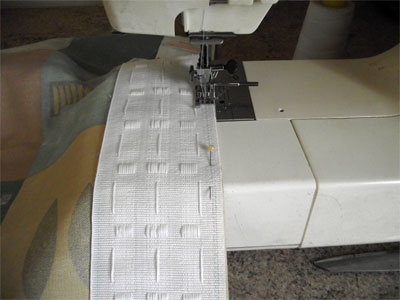
Right, pull out the pin from one corner of the curtain and use it to attach one end of our header tape. Now, pulling the curtain fabric and header tape tight as you go. Work your way along the fold, removing each pin and replacing it to attach the header tape.
Get the scissors ready..! Before we use them though, stitch along the upper edge of the header tape. Ok, go on then – use the scissors to snip off the threads at the ends.
With our curtain laid out flat again, unfold the top and cut off the excess curtain fabric along the center of the header tape. Be careful to avoid the strings though, if you snip them you won’t be able to gather your finished curtain.
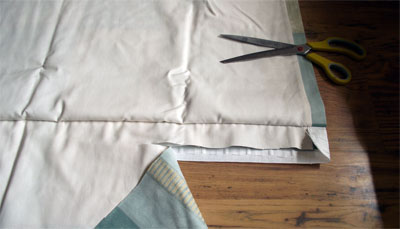
Now stitch along the bottom edge of the header tape and snip off the excess thread. TADDA – One shortened curtain..!
So now you know what to do I’ll leave you to get on with the other one – Oh yes, you can start from Step 2 this time though – (we know what the finished length needs to be now).


No comments:
Post a Comment