

Times ago, I made blinds for the kids bedroom, and now I just hanged the kitchen ones. I like roman shades, they look modern and add a nice finished touch to any room. Today I will explain how you can sew your own ones. They are removable, which mean you can easily take them off to wash them. It a quite long tutorial, I hope to provide clear explanations. Don’t hesitate to leave a comment if you have any doubt.
Material: Nice fabric and matching thread, plastic rings, 1/2 wooden dowels, a 1 x 2 wood plank, velcro, some rope, blind hooks.

First step, take the measurements. Definite the finish blind dimension (red square), think to leave more fabric on the top part, you need some space to fold the blind above the window. You need to add 1 inch on each side for the seams, and you need to add extra high for each dowel you will use in your blind (green lines).
Example: the finished blind need to be 50 inches width x 40 inches high. Adding the seams, the fabric dimensions must be 52 inches x 42 inches. You need to add 2 inches for each dowel, in this case 6 dowels, 2 inches x 6 = 12 inches to add on the height. So the fabric piece to cut is 52 inches x 54 inches.
The number of dowels you will need will depend of the window dimension. I suggest to place one every 6-10 inches. Calculate to place them in a uniform manner along the entire height.


Take the fabric, fold the vertical edges and sew them.
Fold the top edge and sew a piece of velcro all along. This will allow
you to take off the blind if you want to wash it.

Take a ruler and trace the lines to make the fold where the dowels are gonna be slide in. For this blind, we place a dowel every 6 inches ( = your measure on the pic). Starting from the top (just under the velcro), take the measure + 3 inches. It this case 6 in. + 3in.= 9 inches. Trace a line at 9 inches, and a second one, parallel, at 2 inches distance. Leave 6 in. (= your measure) and trace a line, and a second one at 2 in. And so on until the bottom edge.
The measures must fall just on the edge, if it is not, start again by modifying the distance between each dowel fold (= your measure)

Fold the blind through the inside following the lines, both lines must be on top of each other. Pin and sew on the line.

Repeat to make all the folds. To make the bottom fold, you just need to fold the edge. When all the fold are made, iron your blind.

Hand stitch a ring on each fold, at more or less 1 inch from the edge. Do it on both sides.

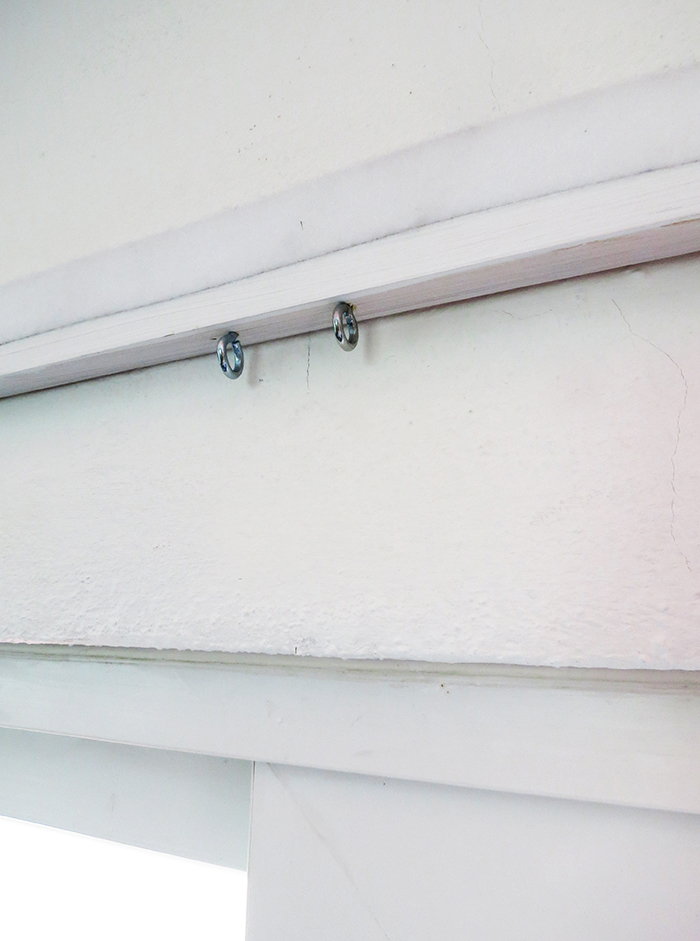
Time to hang the blind on the wall. Screw the 1×2 plank on top of the window. I place it at 7 inches above the window, but it will depend of your folds dimensions. Screw 2 eye screw (hook) on the lower part of the board. I make 2 blinds, so in this case, I will need 4 eye screws (2 for each blind).
If you like too, you can paint the wood. Glue velcro on the upper part of the plank. You can use adhesive velcro, or a glue gun to fix it.


Attach you blinds on the wall, just put both velcro sides ( the blind one and the plank one) on top of each other and press. Ensures that the shades are straight, the good think is you can easily remove them if needed. Cut the 1/2 wooden dowels, 1inch smaller than the blind width, and slide them into each fold.

Almost done, to open and close the blinds, you have to pass 2 pieces of rope into the rings and eye screws. First rope: start with a knot, pass the rope into each ring and both eye screws (green line on the pic). Second rope: make a knot with the lower ring, pass into each ring and one eye screw (red line). Joint both rope, adjust the lenght. Both rope should be slightly tense so that the blind opens and closes right, finish with a knot.


To attach the rope, and leave the blind open, fix a blind hook on the window side. For some reason I couldn’t find them at my hardware store, so I made one in wood and paint it white.

And done! I hope it will help you to sew your own blind. For my kids bedroom I made a lining with blackout fabric. You can see some pics of the blinds in my son bedroom HERE.


The key holder box on the right is also a DIY and if you want to make a fabric planter who match your shades, have a look HERE.

Credit : Oh Deco


Wonderful thanks for sharing amazing options!
ReplyDeleteSheers Shadings